Monday, April 30, 2012

Typewriter Nails


I know these cute newspaper nails have been done in bunches of blogs over the past couple of months, but just in case, I thought I'd post a tutorial. Not only are they cute and stylish, but easy enough for even newcomers to the nail art world to create.

You will need:
  • Base/Top coat
  • White nail polish
  • Rubbing alcohol
  • Newspaper


Start of with a clear coat. Next, paint your nails with two solid coats of white nail polish.


Let your nails dry completely before moving on to the next step. For this you will need rubbing alcohol, which you can pour into the lid or some other small container. You can find rubbing alcohol almost anywhere - I found this one at Walmart.


You will do each of these steps one nail at a time. First, soak the nail in the rubbing alcohol for 5-10 seconds. 


Next, press on a small piece of newspaper onto the nail and leave it there for a couple of seconds. 


Peel it off. You should come out with a result somewhat like this:


Do this for each nail and cover with a top coat. Here's the finished result!


I hope you enjoyed bringing the typewriter to your nails in this fun design. Thanks for reading, and please post your questions and comments below!
-Muffin


Tuesday, April 24, 2012

Improved Mani


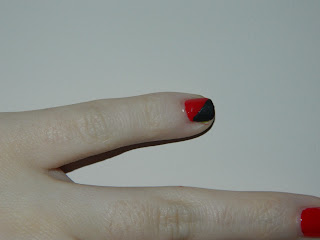
Boring old french tips are so old, right guys? So I decided to do something new and fun, that puts a little spin on the original french tip. Enjoy!


Start off with a base coat to protect your nails.


Next, paint your nails a solid red and then let it dry COMPLETELY. If you're not sure if it's dry enough, wait another ten minutes to be sure.


For the next three steps, you will want to do one nail at a time. Leaving the tape for too long will pull up the nail polish or tear the top color if it dries too much.Take a piece of clear tape and place it diagonally across your nail, covering half of it, like in the picture.


Now paint your second color on the un-taped section. For this I used the Hunger Games themed Stone Cold by China Glaze (and I'm really in love with this color!).


Carefully pull the tape off, making sure not to smudge the paint. Do the same thing for each nail.


Cover the nails with a clear coat to give it a nice shine.


And that's it! These simple nails are fun and easy to do, and can add a little color to any style. I hope you liked this tutorial! Thanks for reading!
- Muffin

Tuesday, April 17, 2012

Blue Penguins

It's getting warm out again, so I had to make my farewell to winter. It happened to come in the form of cute, happy penguins. 


Start off with a base coat to protect your nails.


Next, paint each nail a solid blue.


Now we will be focusing only on the thumbs.
First, paint little white semicircles at the base of both nails.


Then take a toothpick or use the actual brush if you're coordinated enough to paint the two black eyes on each nail.


Take another toothpick and use it to dab on the penguin's nose and feet with orange polish.


Once the nails are dry, cover all of them with a protective top coat.


And here's the finished product. Use a cotton swab dipped in nail polish remover to get rid of any nail polish on the skin.


I hope you enjoyed making these cool little critters!
Catch ya later! 
-Muffin

Monday, April 16, 2012

Pink and Gold Gradient

This is one of my favorite designs! It's great for beginners and pros alike and works for both parties and a day in the office. These colors can easily be changed to make endless designs.


Start off with a base coat to protect your nails.

Then, paint on the main color. I chose a subtle pink.

Let that dry for a bit, because it will be easy to ruin your nails with the gradient if it's not dry.
Once the first color has dried, start with the gradient. I settled on a lovely shade of gold (specifically, China Glaze's Harvest Moon). Take a sponge brush or whatever you prefer to use, paint a little of the gold nail polish onto one corner, and dab it onto your nail. Do this for about half or 2/3 of the nail at the top on each nail.


Once you've finished the first round on each nail, go at it again, this time using the brush to sponge on more gold on the top half of the first gradient. The nail will go from a pink to a light gold to an almost solid gold.


When you're satisfied with the nail, cover it with a top coat to protect the design.


Annnndd you're finished! Only the thumb is shown here, but make sure you've completed all of the nails.


I hope you enjoyed this tutorial! Post your questions and comments below and don't forget to email me (muffinnails@gmail.com) to chat or make suggestions!
Catch ya later!
-Muffin